Lodash 和 Underscore 是非常优秀的当代JavaScript的工具集合框架,它们被前端开发者广泛地使用,不必重复造轮子。且协议开源。江湖传闻,Lodash只是Underscore.js的一个fork,之后在Underscore.js原有的成功基础上取得了更大的成果,Lodash的性能远远的超过了Underscore。下面就简单的介绍一下如何在Cocos Creator2.4.5里面使用Lodash和Underscore。
Underscore

介绍
官网及介绍
截止目前笔者写此文的时候,官网最新版本是 1.13.1
v1.13.1 Downloads (Right-click, and use “Save As”)
ESM (Development) 65.9 KB, Uncompressed with Plentiful Comments (Source Map) ESM (Production) 8.59 KB, Minified and Gzipped (Source Map) UMD (Development) 68.4 KB, Uncompressed with Bountiful Comments (Source Map) UMD (Production) 7.48 KB, Minified and Gzipped (Source Map) Edge ESM Unreleased, current master, use by your own judgement and at your own riskEdge UMD Unreleased, current master, use if you’re feeling luckyv1.13.1 CDN URLs (Use with
<script src="..."></script>)
https://cdn.jsdelivr.net/npm/underscore@1.13.1/underscore-umd-min.jshttps://cdn.jsdelivr.net/npm/underscore@1.13.1/underscore-esm-min.jshttps://unpkg.com/underscore@1.13.1/underscore-umd-min.jshttps://unpkg.com/underscore@1.13.1/underscore-esm-min.jshttps://pagecdn.io/lib/underscore/1.13.1/underscore-umd-min.jshttps://pagecdn.io/lib/underscore/1.13.1/underscore-esm-min.jshttps://cdnjs.cloudflare.com/ajax/libs/underscore.js/1.13.1/underscore-umd-min.jshttps://cdnjs.cloudflare.com/ajax/libs/underscore.js/1.13.1/underscore-esm-min.js
Cocos Creator结合Underscore
对于Cocos Creator 的用户 使用 umd 版本的即可,需要文件
JavaScript类库文件 underscore-umd.js(未压缩)或 underscore-umd-min.js(压缩后).d.ts声明文件 index.d.ts
步骤
新建Cocos Creator项目
- 新建一个项目
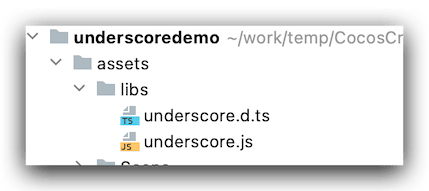
underscoredemo后,然后在underscoredemo/assets下面新建一个libs文件夹 - 放入我们上面下载的 类库文件
.js和声明文件.d.ts,注意二者名字要保持一致。 - 例如下面这样:
- 然后在项目的
HelloWorld.ts写入测试代码,完整内容如下:
1 | import * as _ from "../libs/underscore"; |
查看输出结果
然后我们运行项目查看结果输出:
1 | Cocos Creator v2.4.5 |
以上就是如何 在 Cocos Creator 2.4.5 版本内引入第三方工具库 underscore 的具体步骤。
最后老规矩 放上underscore项目源码地址:点击进入
更多介绍
underscore-analysis 作者的很多文章都值得读一下。
其中:
可以学习一下
Lodash

介绍
官网及介绍
- 英文官网 https://lodash.com/
- 中文官网 https://www.lodashjs.com/
- 自定义构建文档 https://lodash.com/custom-builds
截止目前笔者写此文的时候,官网最新版本是 v4.17.21
Lodash 构建工具比较全面,可以各种定制自己需要的模块和格式,在此不多赘述,具体可以参考上面的 构建文档
这里具体说说,声明文件,我们查看声明文件的时候 发现 Lodash 的声明文件是 很多个文件 集合在一个文件夹里,这个时候虽然不影响使用,但是看起来挺不习惯的,有没有合并后的文件呢,答案是有的。
在线搜索 第三方库声明文件 地址 https://www.typescriptlang.org/dt/search
我们搜索 Lodash 找到这个地址
https://github.com/DefinitelyTyped/DefinitelyTyped/tree/master/types/lodash
这个地址里面 文件如下:
1 | lodash |
这里提供一个 如何下载 GitHub 文件夹的在线地址:DownGit
从下载的文件 看到 有个叫做 scripts 的文件夹,里面是关于构建的脚本,因我本地 node版本比较低,没有尝试该方法
接着我们查看这个 叫做 v3 的文件夹 下面内容如下:
1 | /Users/smile/Downloads/lodash/v3 |
其中 index.d.ts 就是我们要的 声明文件。用法如下
Cocos Creator结合lodash
对于Cocos Creator 的用户 使用 umd 版本的即可,需要文件
JavaScript类库文件 我们使用命令生成:
1 | $ npm i -g npm |
.d.ts声明文件 index.d.ts
步骤
新建Cocos Creator项目
- 新建一个项目
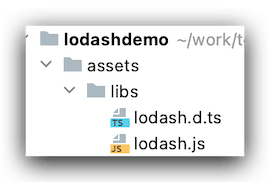
lodashdemo/assets后,然后在lodashdemo/assets下面新建一个libs文件夹 - 放入我们上面下载的 类库文件
.js和声明文件.d.ts,注意二者名字要保持一致。 - 例如下面这样:
- 然后在项目的
HelloWorld.ts写入测试代码,完整内容如下:
1 | import * as _ from "../libs/lodash"; |
查看输出结果
然后我们运行项目查看结果输出:
1 | Cocos Creator v2.4.5 |
以上就是如何 在 Cocos Creator 2.4.5 版本内引入第三方工具库 lodash 的具体步骤。
更多关于如何构建项目
Build Types
Core builds, that are 4 kB, are created using the
modifier.
Strict builds, with
ES strict mode
enabled, are created using the
modifier.
Modularized builds, with Lodash split into modules, are created using the
modifier.
Build Commands:
Use the
command to pass comma separated categories of functions to include in the build.
Valid categories are “array”, “collection”, “date”, “function”, “lang”, “object”, “number”, “seq”, “string”, & “util”.
Use the
command to pass comma separated names of ways to export the
function.
Valid exports are “amd”, “commonjs”, “es”, “global”, “node”, “npm”, “none”, & “umd”.
Use the
command to specify code to replace the
IIFE
that wraps Lodash.
Use the
command to pass comma separated names of functions to include in the build.
Use the
command to pass comma separated function/category names to remove from the build.
Use the
command to pass comma separated function/category names to add to the build.
Use the
command to pass the file path pattern used to match template files to precompile.
Note: Precompiled templates are assigned to the
_.templatesobject.
Use the
command to pass template settings used when precompiling templates.
Use the
command to specify the AMD module ID for Lodash or the module ID used to include Lodash in compiled templates.
Use “none” as the module ID to create compiled templates without a dependency on Lodash.
Notes:
- The
exportsvalues “es” & “npm” may only be used in conjunction with themodularizecommand- The
modularizecommand uses the firstexportsvalues as its module format, ignoring subsequent values- Unless specified by
-oor--outputall files created are saved to the current working directoryThe following options are also supported:
-c,--stdout……………. Write output to standard output-d,--development….. Write only the non-minified development output-h,--help……………….. Display help information-m,--source-map……. Generate a source map using an optional source map URL-o,--output……………. Write output to a given path/filename-p,--production……. Write only the minified production output-s,--silent…………… Skip status updates normally logged to the console-V,--version…………. Output current version of Lodash
最后老规矩 放上lodash项目源码地址:点击进入
其他技术相关
ramda 一个很重要的库,提供了许多有用的方法,每个 JavaScript 程序员都应该掌握这个工具