之前的文章都是讲Cocos Creator 如何在原生上通信和踩坑以及一些小技巧的,这篇文章简单的说说如何多渠道打包,由于学习时间有限,这篇文章简单的说说如何多渠道配置包名和更改app名字和App图标样式。
首先,我们需要用Cocos Creator 正常出安卓包,然后才能进行下面操作
环境
Cocos Creator 2.4.3
Gradle 4.1.10 (cocos 默认构建输出)
gradle 插件版本 3.2.0 (cocos 默认构建输出)
步骤 配置Gradle 文件 在项目的 gradle 文件的android对象添加 多渠道配置
1
2
3
4
5
6
7
8
9
10
11
12
13
14
15
16
17
18
19
20
21
22
23
24
25
26
27
28
29
30
31
32
33
34
35
36
37
38
39
40
41
42
android { compileSdkVersion PROP_COMPILE_SDK_VERSION.toInteger() buildToolsVersion PROP_BUILD_TOOLS_VERSION defaultConfig { applicationId "org.cocos2d.demo" minSdkVersion PROP_MIN_SDK_VERSION targetSdkVersion PROP_TARGET_SDK_VERSION versionCode 1 versionName "1.0" flavorDimensions "app" productFlavors { common { manifestPlaceholders = [ youmi_channel: "common" , app_name : "默认commonApp" , app_icon : "@mipmap/ic_launcher" ] dimension "app" } baidu { applicationId "org.cocos2d.demo.baidu" manifestPlaceholders = [ youmi_channel: "baidu" , app_name : "测试baiduApp" , app_icon : "@mipmap/ic_launcher" ] dimension "app" } sougou { applicationId "org.cocos2d.demo.sougou" manifestPlaceholders = [ youmi_channel: "sougou" , app_name : "测试sougouApp" , app_icon : "@mipmap/hykb_ic_launcher" ] dimension "app" } } }
其中值得注意的是 youmi_channe、app_name、app_icon 这三个都分别是三个变量名字,因为是变量,所以会跟随渠道不同而变成不同的值。
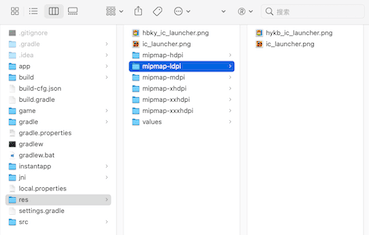
ic_launcher 和 hykb_ic_launcher 是图标素材 默认生成了一份 ic_launcher的图标 我们在 生成 hykb_ic_launcher 一套这样素材 放到 对应目录,比如我的:
配置AndroidManifest.xml 根据前面我们的配置 接下来配置AndroidManifest.xml
1 2 3 4 5 6 7 8 9 10 11 12 13 14 15 16 17 18 19 20 21 22 23 24 25 26 27 28 29 30 31 32 33 <application android:allowBackup ="true" android:label ="${app_name}" android:usesCleartextTraffic ="true" android:icon ="${app_icon}" tools:replace ="android:label" > <meta-data android:name ="android.app.lib_name" android:value ="cocos2djs" /> <meta-data android:name ="youmi_channel" android:value ="${youmi_channel}" /> <meta-data android:name ="app_name" android:value ="${app_name}" /> <meta-data android:name ="app_icon" android:value ="${app_icon}" /> <activity android:name ="org.cocos2dx.javascript.AppActivity" android:screenOrientation ="portrait" android:configChanges ="orientation|keyboardHidden|screenSize|screenLayout" android:label ="${app_name}" android:theme ="@android:style/Theme.NoTitleBar.Fullscreen" android:launchMode ="singleTask" android:taskAffinity ="" > <intent-filter > <action android:name ="android.intent.action.MAIN" /> <category android:name ="android.intent.category.LAUNCHER" /> </intent-filter > </activity > </application >
其中核心代码是
1 2 3 4 5 6 7 8 9 <meta-data android:name ="youmi_channel" android:value ="${youmi_channel}" /> <meta-data android:name ="app_name" android:value ="${app_name}" /> <meta-data android:name ="app_icon" android:value ="${app_icon}" />
1
2
3
android:label="${app_name}" android:icon="${app_icon}" tools:replace="android:label"//如果报错 Suggestion: add 'tools:replace="android:label"' to <application > element at AndroidManifest.xml 加上这一行
上面说了 把对应的变量在这个文件读取的时候 赋值即可,youmi_channe 这个属性暂时没有用到,先做保留使用。
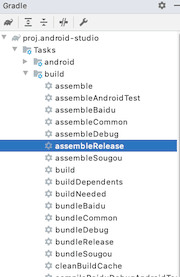
构建App 我们打开Android Studio 的右侧 Gradle 窗口 选择自己要的构建类型 这里 我们选择的 release 类型
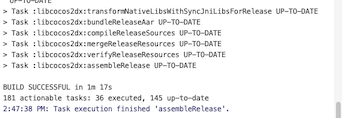
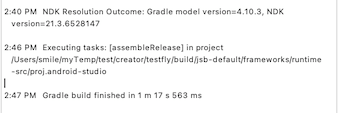
等待打包结果。这个过程根据渠道多少和 项目大小以及电脑性能有关,一般是5-30分钟不等。
上面这样就是打包成功了!
打包好的路径是jsb-default/frameworks/runtime-src/proj.android-studio/app/build/outputs/apk/渠道
安装照验证
项目代码里获取渠道信息 先运行一下项目
这样才能生成 BuildConfig.java信息
AppActivity写代码 1 2 3 4 5 6 7 import org.cocos2d.demo.BuildConfig;Log.e("TEST" ,this .getPackageName()); Log.e("TEST" , BuildConfig.APPLICATION_ID); Log.e("TEST->FLAVOR" , BuildConfig.FLAVOR);
我们也可以查看其他信息
1 2 3 4 5 6 7 8 9 10 package org.cocos2d.demo;public final class BuildConfig { public static final boolean DEBUG = Boolean.parseBoolean("true" ); public static final String APPLICATION_ID = "org.cocos2d.demo.baidu" ; public static final String BUILD_TYPE = "debug" ; public static final String FLAVOR = "baidu" ; public static final int VERSION_CODE = 1 ; public static final String VERSION_NAME = "1.0.0" ; }
踩坑记录 记录一 Error:Execution failed for task ‘:app:processXXXDebugManifest’. 1 2 Error:Execution failed for task ':app:processXXXDebugManifest'. > Manifest merger failed with multiple errors, see logs
解决办法 : app的module里面的AndroidManifest.xml文件有冲突的地方,排查一下冲突的字段删除
记录二 Execution failed for task ‘:CnMetro:processCczsReleaseManifest’ 1 2 3 4 Execution failed for task ':CnMetro:processCczsReleaseManifest'. > Manifest merger failed : Attribute application@label value=(进站请刷卡) from AndroidManifest.xml:32:13-40 is also present at [GameSdk.aar] AndroidManifest.xml:34:9-41 value=(@string/app_name). Suggestion: add 'tools:replace="android:label"' to <application> element at AndroidManifest.xml:30:5-80:19 to override.
解决办法 :根据提示 添加 tools:replace="android:label到元素内
报Entry name ‘res/layout/notification_action.xml’ collided错 解决办法 : 进入build菜单,clear project 清除一下缓存就好了!
参考